Git is like the superhero of file management—it keeps track of changes in your project, so you always know who made what changes and when. Imagine having a personal assistant for your files!
It’s not just about the changes; it’s like having a detailed history book for your project. Each change is stored with a unique ID called a ‘commit,’ which is like a secret code holding all the info about the files at that moment.
So, Git not only helps you stay organized but also makes it easy to collaborate and trace changes in your project based on comments or associated tasks.
So, How Git is able to Track These Files? Is Git Some Kind of Registry ?
Git maintains its version control information, including hash codes and other metadata, in a hidden directory within your project called `.git`. This directory is usually located at the root of your Git repository.
The `.git` directory in a Git repository doesn’t function exactly like a registry. It serves as the internal database and metadata storage for Git, managing version control information for your project. The `.git` directory contains various subdirectories and files that handle different aspects of Git’s functionality.
Here’s a brief overview of some key components within the `.git` directory:
Objects (`/.git/objects`): This directory stores the content of your files and commits. Git uses a content-addressable storage system, assigning a unique hash to each object.
Refs (`/.git/refs`): This directory contains references to commits, branches, tags, and other objects in your repository.
Config (`/.git/config`): This file holds configuration settings for the Git repository.
Head (`/.git/HEAD`): This file points to the current branch you are on.
So, the `.git` directory is specific to Git version control, managing the version history and metadata of your project.
let’s go with the git jargons and understand them..
Repository:
A repository is the place where all your project files are stored with the history of those files.
Git:
Git is the tool or system that allows you to manage versions and changes in your files.
Git Repository:
Git repository is where Git stores and keeps track of your project’s files and their history.
So git is a version control system, a tool that helps manage and track changes in your files. On the other hand, a repository, often referred to as a Git repository, is the place where all your project files, along with their version history, are stored.
So How Can We Change a Project to ‘Git Repository’?
Getting started with Git is quite straightforward. Here are the basic steps to get the Git tool:
Download and Install Git:
– Visit the official Git website: [Git – Downloads](https://git-scm.com/downloads)
– Select the appropriate version for your operating system (Windows, macOS, Linux) and follow the installation instructions.
The recommended installer for Git typically provides an option to automatically add Git to the system PATH during the installation process. If you choose this option, you won’t need to manually configure the PATH afterward.
How to Know if Git is Installed on Machine?
After installation, open a command prompt or terminal window. Type `git –version` and press Enter. This should display the installed Git version, confirming a successful installation.
Git Help, Support & Training
Git comes with the command line help and tutorials which can guide to get all the help required.
there are different commands to get different help based on need.
git help tutorial – A useful minimum set of commands for Everyday Git
git help everyday – A tutorial introduction to Git
git help revisions – Specifying revisions and ranges for Git
Git Tricks & Tips
https://github.com/git-tips/tips
https://opensource.com/article/22/4/git-tips
Git Essential Commands
At the core of Git, there are a few fundamental commands that serve as the foundation for many other operations. These foundational commands are essential for version control and collaboration in Git. Here are some of the main Git commands from which others are derived:
1. git init:
– Initializes a new Git repository, creating the necessary data structures and configuration files.
git init
2. git clone:
– Creates a copy of a remote repository on your local machine.
git clone
3. git add:
– Adds changes in the working directory to the staging area, preparing them for a commit.
git add
4. git commit:
– Records changes in the staging area to the repository, creating a new commit.
git commit -m "Commit message"
5. git status:
– Shows the status of changes as untracked, modified, or staged.
6. git log:
– Displays the commit history, showing details like commit messages, authors, and timestamps.
git log
7. git branch:
– Lists existing branches or creates a new branch.
  git branch
  git branch <branch-name>
8. git checkout:
– Switches between branches or restores files from different commits.
git checkout <branch-name>

git checkout <commit-hash> -- <file>
9. git merge:
– Combines changes from different branches.
git merge <branch-name>
10. git pull:
– Fetches changes from a remote repository and merges them into the current branch.
git pull
11. git push:
– Updates a remote repository with local changes.
git push
12. git remote:
– Manages connections to remote repositories.
git remote add remote-name remote-url
13. git fetch:
– Retrieves changes from a remote repository without merging them into the local branch.
git fetch
14. git reset:
– Resets the current branch to a specific commit, optionally discarding changes.
git reset <commit-hash>
15. git rebase:
– Reapplies changes from one branch onto another, typically used to maintain a linear commit history.
git rebase <branch-name>
These commands cover the essential operations in Git. From these basics, various workflows and collaboration strategies are built, making Git a powerful version control system.
Now as know git commands and we are ready with the git installation , let’s Make our Project into git –repository
I have a project named ‘AGitProject’ containing various files and internal packages. Let’s transform this project into a Git repository.
Turn Exisiting Project “AGitProject” into a Git Repository
To turn your existing project “AGitProject” into a Git repository, we need to follow these steps:
- Navigate to Project Directory:
Open a command prompt or terminal window and navigate to the root directory of your “AGitProject.”
- Initialize a Git Repository:
Run the following command to initialize a new Git repository in your project directory:
git init
- Stage[Preparation] Your Files:
Staging Git files refers to preparing changes for the next commit by selecting and organizing specific modifications to be included in the snapshot of the repository.
Use the following command to stage all the files in your project for the initial commit:
git add . [to include all the files as part of repostory]
If you want to stage specific files, you can replace `.` with the file names or paths.
git add file_1 file_2
- Commit [Submit] Your Changes:
Commit the staged files to the Git repository:
git commit -m “Initial commit”
Replace “Initial commit” with a meaningful commit message describing your initial changes.
Now, your “AGitProject” is a part of Git repository, and the current state of your project is saved in the initial commit.
Git As a Collaboration Tool
This is the best feature of git, making it so popular. As with help of git multiple people can work on the same project in same time on completely different features.
If you want to collaborate with others you need to host it on a platform like GitHub, GitLab, or Bitbucket, so others can have a access of this.
You can then push your local repository to the remote repository.
GitHub:
- Create a Repository on GitHub:
– Log in to your GitHub account.
– Click on the “+” sign in the top right corner and choose “New repository.”
– Follow the instructions to create a new repository.
- Navigate to Your Local Repository:
– Open a terminal or command prompt.
– Navigate to the root directory of your local Git repository.
- Connect Local Repository to GitHub:
– Use the following commands to set up the remote connection to GitHub:
git remote add origin https://github.com/your-username/your-repository.git
Replace `your-username` with your GitHub username and `your-repository` with the repository name.
- Push Changes to GitHub:
– Push your local repository to GitHub:
git push -u origin master
This assumes your main branch is named “master.” If it’s named differently, replace “master” with your branch name.
GitLab:
- Create a Repository on GitLab:
– Log in to your GitLab account.
– Create a new project/repository.
- Navigate to Your Local Repository:
– Open a terminal or command prompt.
– Navigate to the root directory of your local Git repository.
- Connect Local Repository to GitLab:
– Use the following commands to set up the remote connection to GitLab:
git remote add origin https://gitlab.com/your-username/your-repository.git
Replace `your-username` with your GitLab username and `your-repository` with the repository name.
- Push Changes to GitLab:
– Push your local repository to GitLab:
git push -u origin master
Bitbucket:
- Create a Repository on Bitbucket:
– Log in to your Bitbucket account.
– Create a new repository.
- Navigate to Your Local Repository:
– Open a terminal or command prompt.
– Navigate to the root directory of your local Git repository.
- Connect Local Repository to Bitbucket:
– Use the following commands to set up the remote connection to Bitbucket:
git remote add origin https://bitbucket.org/your-username/your-repository.git
Replace `your-username` with your Bitbucket username and `your-repository` with the repository name.
- Push Changes to Bitbucket:
– Push your local repository to Bitbucket:
git push -u origin master
Now As you have hosted Your Local Repository to Remote, Anyone with provided access can get this repository on their machine and can start working on it.
Login to Repository and you should be able to see the option to clone it , on click of it you will have the URL to clone it
example:
Cloning GitHub Repo: git clone https://github.com/username/repository.git
Cloning GitLab Repo: git clone https://gitlab.com/username/repository.git
Cloning Bitbucket Repo: git clone https://bitbucket.org/username/repository.git
Git Branching
In Git, branching is a powerful feature that allows multiple lines of development to coexist in parallel. Each branch represents a distinct line of development with its own set of changes. This allows developers to work on features, bug fixes, or experiments independently without affecting the main codebase.
How Multiple People Collaborate Simultaneously:
- Create a New Branch:
– Each developer can create their own branch using the `git branch` command:
git branch feature-branch
- Switch to the New Branch:
– Developers switch to their newly created branch with:
git checkout feature-branch
(Or, with newer versions of Git, you can use `git switch`)
git switch feature-branch
- Make Changes:
– Developers can make changes in their branch independently, working on new features or bug fixes.
- Commit Changes:
– After making changes, developers commit them to their branch:
git commit -m “Implemented feature XYZ”
- Push the Branch:
– Developers push their branch to the remote repository (GitHub, GitLab, Bitbucket, etc.):
git push origin feature-branch
- Create a Pull Request (GitHub/GitLab) or Merge Request (Bitbucket):
– Developers initiate a pull request/merge request to propose their changes for integration into the main branch.
- Review and Merge:
– Team members review the changes, and if everything looks good, the changes are merged into the main branch.
This process allows multiple people to work on different aspects of a project simultaneously without interfering with each other’s work. It promotes collaboration, parallel development, and helps prevent conflicts by isolating changes in separate branches.
Now as we got a understanding of how git works and how we can collaborate, Lets discuss how we can effectively use it and what challenges a developers usually face while coding.
Every-Day Challenges
Conflict
In Git, a conflict occurs when two or more branches have made changes to the same part of a file or files, and Git is unable to automatically merge those changes. Conflicts typically happen during a `git merge` or `git pull` operation when Git tries to combine changes from different branches.
Here’s a breakdown of how conflicts can arise:
- Parallel Changes:
– Two or more branches evolve independently, each making changes to the same file(s).
– For example, if both Branch A and Branch B modify the same line in a file, a conflict can occur.
- Merging/Branching:
– When you attempt to merge or pull changes from one branch into another, Git analyzes the changes made on each branch.
- Conflict Detection:
– If Git detects that changes on different branches overlap (i.e., modifications to the same lines), it flags those areas as conflicting.
- Manual Resolution:
– Git is unable to automatically merge conflicting changes, and it stops to allow the user to resolve the conflict manually.
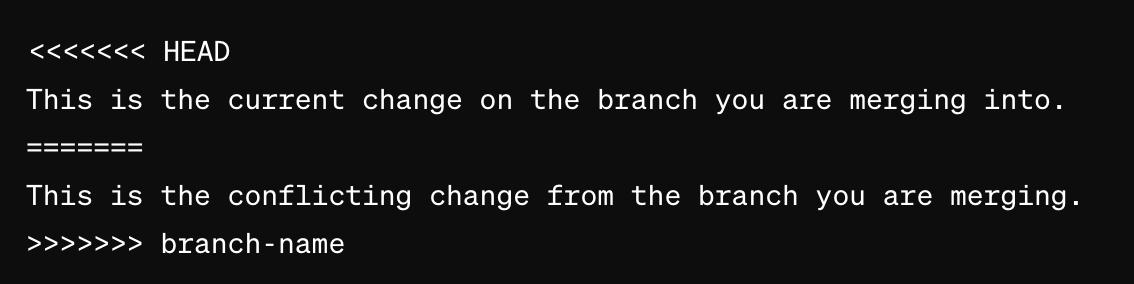
- Conflict Markers:
– Git inserts conflict markers in the affected file(s) to indicate the conflicting sections. These markers typically look like `<<<<<<<`, `=======`, and `>>>>>>>`.
Example conflict marker in a file:
- Resolution:
– The user needs to edit the file(s) to resolve conflicts by choosing which changes to keep.
– After resolving conflicts, the changes are staged using `git add` and then a new commit is created.
The conflict resolution process involves manually reviewing the changes, understanding what each branch was trying to achieve, and deciding how to integrate those changes successfully.
Conflicts are a part of collaborative development, especially in projects where multiple contributors work on different aspects simultaneously.
Apart from branching one can get conflict whenever you are trying to get the new changes in your current branch Example :
1. Pulling changes from Stash
git stash pop
2. Getting changes from a Commit
git cherry-pick commit-hash-code
3. Moving from one branch to another with staged.
In this scenario, conflicts might arise when using git checkout. If you have uncommitted changes in your working directory, and these changes conflict with the changes in the branch you are attempting to switch to, Git will prevent the checkout to avoid overwriting your local modifications.

Easiest way to resolve these conflicts is generally by removing the conflict markers and accepting the changes from the upstream and including your changes as well.
Conflict Resolution in Different Editors
Intellij: https://www.youtube.com/watch?v=WgipWkaU2MM
Eclipse: https://www.youtube.com/watch?v=uOJJ1TUTZzc&ab_channel=LearningFromExperience
vs-code: https:/ /www.youtube.com/watch?v=HosPml1qkrg
Divergent Branch
A divergent branch issue occurs when two branches, often from a common ancestor, have diverged, meaning that both branches have received different sets of changes, and Git cannot automatically reconcile them through a simple fast-forward or automatic merge.
This situation is common when two developers are working on the same branch independently, and both make changes that conflict with each other.
or
you synced your remote branch with other branch to pull commits from other branches and you have a local commit as well.

Example:
CommitC
|
v
Remote/Branch A: A — B — C
CommitD
|
v
Branch A: A — B — D
In this example:
– Both `Branch A` and `Remote/Branch A` share a common ancestor at `CommitA`.
– On `Branch A`, there are additional commits `B` and `D`.
– On `Remote/Branch A`, there’s an additional commit `C`.
– The branches have diverged after `CommitB`.
– When attempting to merge or pull changes from `Remote/Branch A` into `Branch A`, Git recognizes the divergence and reports a conflict.
This representation illustrates how different commit histories can lead to a divergent branch issue. Resolving this issue would involve manually reconciling the conflicting changes introduced in `CommitC` and `CommitD`.
- Resolution:
Rebasing: Rebasing is most common way to resolve this issue.
syntax: git rebase origin/your-branch and git push -f origin/your-branch
With Git applies your changes on top of the remote branch.

So this is how your local branch will look after Rebase. Basically all the remote branch commits which are divergent with local commits commit will be merged and new commit will be created in local i.e. c’ .
C’ is created after applying remote branch commits[D, E, F] and then C on top of it.
    C'(your local branch after rebase)

                    /

             A --- B --- C  (your old local branch)

                   \

                     D --- E --- F  (remote branch without updation)
Making Your Local Branch similar to Remote
In case if you think that the local commits are not important and you want your branch to look similar to remote and apply changes.
git fetch origin

git reset --hard origin/branchName
you can find a stack-overflow post on similar topic.
https://stackoverflow.com/questions/1628088/reset-local-repository-branch-to-be-just-like-remote-repository-head
Detached HEAD
A “detached HEAD” state in Git refers to a situation where your repository is not on any branch. Instead, it is pointing directly to a specific commit. This can happen for various reasons, and while it’s not an issue per se, it can lead to confusion if you’re not aware of it.
Causes of Detached HEAD
- Checking Out a Specific Commit:
– If you use `git checkout` or `git switch` followed by a commit hash instead of a branch name, you enter a detached HEAD state.
git checkout <commit-hash>
- Checking Out a Tag:
– If you check out a tag, which is a reference to a specific commit, your repository will enter a detached HEAD state.
git checkout <tag-name>
- Conflict during Merge or Rebase:
– If there is a conflict during a merge or rebase operation, Git might leave you in a detached HEAD state to allow you to resolve the conflict before proceeding.
Indicators of Detached HEAD:
– When you are in a detached HEAD state, you won’t see the name of any branch when you run `git branch`.
– The output of `git status` might indicate that you are in a detached HEAD state.
Risks and Considerations
– While in a detached HEAD state, any new commits you make will not be associated with a branch and might be lost if you switch branches or close the repository.
– It’s a read-only state, meaning you can’t directly make changes to the branch you were on before entering the detached HEAD state.
Resolution
- Create a New Branch:
– The safest way to work with changes in a detached HEAD state is to create a new branch.
git checkout -b new-branch-name
– This way, your changes are associated with a branch, and you won’t risk losing them.
- Switch to an Existing Branch:
– If your intention was to make changes on an existing branch, switch to that branch.
git switch existing-branch-name
- Commit Changes:
– If you made new commits while in a detached HEAD state, create a new branch and commit your changes.
git checkout -b new-branch-name
git commit -m "Your message"
- Resolve Conflicts:
– If you entered a detached HEAD state due to a conflict, resolve the conflict and then either commit the changes or switch to a branch.
# After resolving conflicts
git add .
git commit -m "Merge/Rebase conflict resolution"
In summary, a detached HEAD state is a common situation in Git, often occurring when you work with specific commits or tags. To avoid potential issues, create a new branch to continue your work, ensuring that your changes are properly associated with a branch.
Reverting Commit
If you have made any accidental commit and want to revert that change. Git revert creates a new commit and it does not delete the reverted history so you can revert if needed.
git revert <commit-hash>
git push origin <branch-name>
Conclusion
Git is a powerful version control system that streamlines collaboration and helps manage project changes effectively. By understanding essential Git concepts, commands, and workflows, developers can navigate common challenges like conflicts and divergent branches. Embracing Git’s capabilities empowers teams to work together seamlessly, ensuring a more organized and efficient development process. With Git, you can confidently track, review, and merge changes, making it an indispensable tool for any collaborative project.