The ESP32 microcontroller has revolutionized the Internet of Things (IoT) landscape with its powerful processing capabilities and built-in Wi-Fi and Bluetooth support. For developers and hobbyists alike, learning how to configure Wi-Fi on the ESP32 is a fundamental step in building connected devices. This blog will walk you through the steps to configure Wi-Fi on the ESP32, providing a seamless beginning to your IoT endeavors.
1. Introduction to ESP32 and Wi-Fi
The ESP32, created by Espressif Systems, is an affordable microcontroller featuring built-in Wi-Fi and Bluetooth capabilities. It is extensively utilized in IoT projects, spanning from smart home systems to industrial solutions. Wi-Fi connectivity enables the ESP32 to communicate with cloud services, control devices remotely, and gather data in real-time.
2. Getting Started with ESP32
Requirements
To begin, ensure you have the following:
- An ESP32 development board.
- A micro-USB cable.
- Arduino IDE installed on your computer.
Setting Up the ESP32 Board in Arduino IDE
- Launch Arduino IDE and go to File > Preferences.
- In the “Additional Board Manager URLs” field, enter the following URL:
https://raw.githubusercontent.com/espressif/arduino-esp32/gh-pages/package_esp32_index.json - Go to Tools > Board > Boards Manager and search for “ESP32”.
- Install the “ESP32” by Espressif Systems package.
3. Understanding Wi-Fi Modes
The ESP32 supports three Wi-Fi modes:
- Station Mode (STA): Operates as a client, connecting to an existing Wi-Fi network.
- Access Point Mode (AP): Creates a Wi-Fi network, enabling other devices to connect directly to it.
- Dual Mode: Operates in both STA and AP modes simultaneously.
4. Configuring Wi-Fi on ESP32
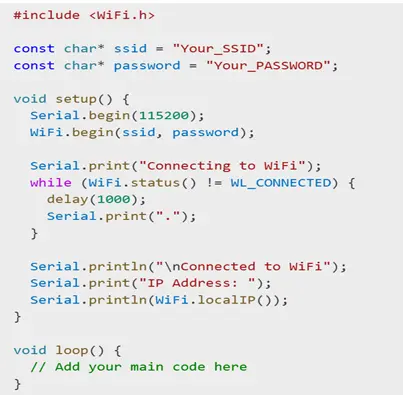
4.1 Connecting to a Wi-Fi Network (Station Mode)
Here’s how you can connect your ESP32 to a Wi-Fi network:
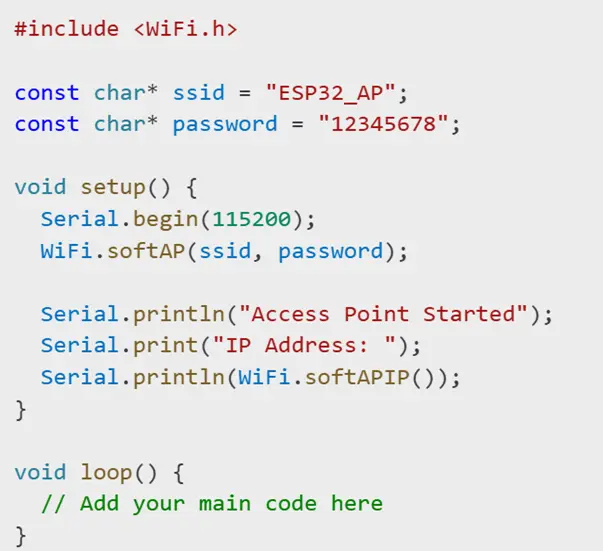
4.2 Setting Up an Access Point
To set up the ESP32 as an Access Point:
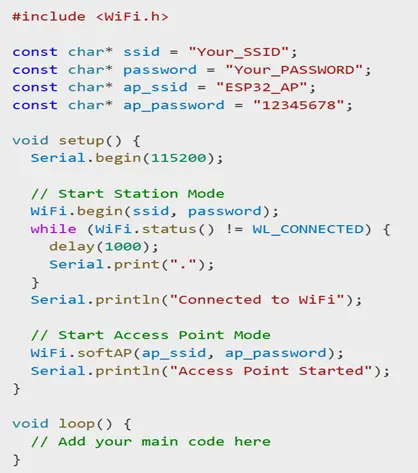
4.3 Combining Station and Access Point Modes
You can use both modes simultaneously for more advanced applications:
5. Advanced Wi-Fi Features
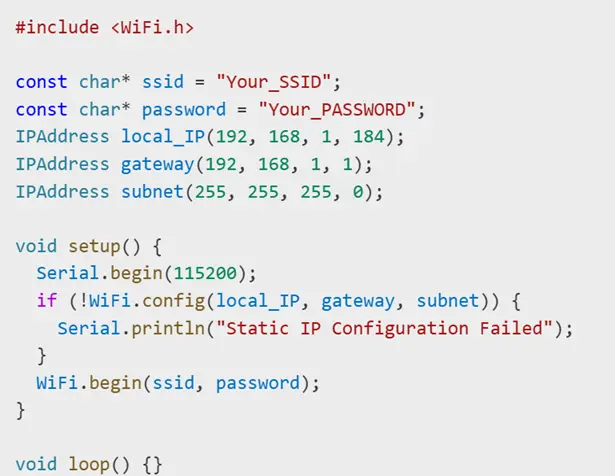
5.1 Setting Static IPs
Assigning a static IP to your ESP32 can simplify network management. Here is an example:
5.2 Enabling Wi-Fi Security
Always use strong passwords and WPA2 security for access points. Avoid using open networks unless absolutely necessary.
5.3 Using Wi-Fi Mesh Networks
The ESP32 supports ESP-Mesh, allowing multiple ESP32s to create a self-healing and scalable Wi-Fi network. This is ideal for large-scale IoT deployments.
6. Integrating with Cloud Services
6.1 Sending Data to the Cloud
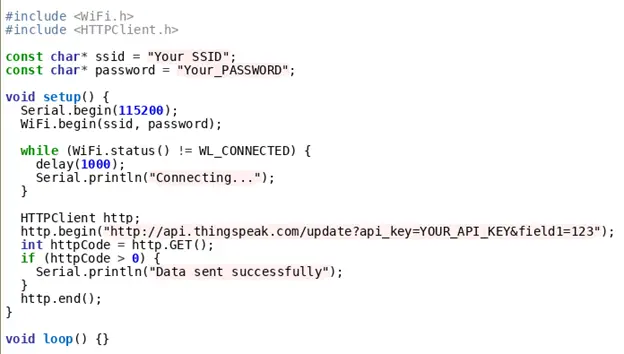
Popular platforms like AWS IoT, Google Cloud, and ThingSpeak can receive and analyze data from your ESP32. For example, to send data to ThingSpeak:
6.2 Using MQTT
Message Queuing Telemetry Transport (MQTT) is a lightweight protocol that makes real-time IoT communication efficient. Here’s an example of configuring MQTT on the ESP32 using the PubSubClient library:
- Begin by installing the PubSubClient library in the Arduino IDE.
- Use the following example code to connect to an MQTT broker and publish messages:
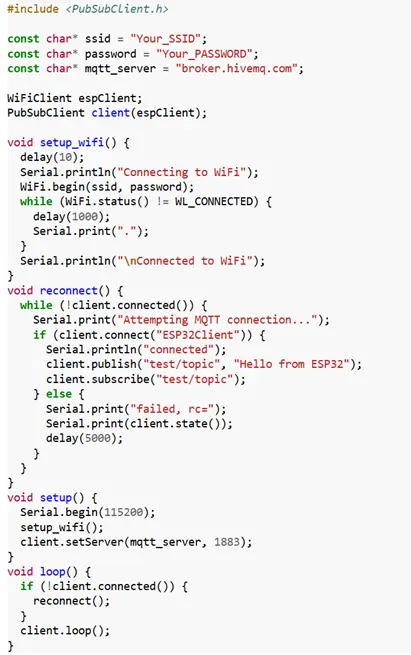
This code connects to a public MQTT broker, publishes a message, and subscribes to the same topic for real-time communication.
7. Troubleshooting Common Issues
7.1 Connection Issues
- Problem: ESP32 fails to connect to Wi-Fi.
- Solution: Verify the Service Set Identifier (SSID) and password. Check if the router is operational and within range.
- Problem: Unable to obtain an IP address.
- Solution: Ensure the Dynamic Host Configuration Protocol (DHCP) server on your router is enabled or configure a static IP.
7.2 MQTT Connection Issues
- Problem: ESP32 fails to connect to the MQTT broker.
- Solution: Confirm the broker address and port. Check if the broker is accessible and not blocked by a firewall.
- Problem: Messages are not being published or received.
- Solution: Ensure you are subscribed to the correct topic. Verify the Quality of Service (QoS) settings and network stability.
7.3 Power Supply Issues
- Problem: ESP32 behaves erratically or resets frequently.
- Solution: Use a stable power source with sufficient current (at least 500mA).
7.4 Debugging Tips
- Use Serial.print statements to debug code and monitor the execution flow.
- Check library documentation for specific errors and solutions.
8. Conclusion
Setting up Wi-Fi and MQTT on the ESP32 unlocks endless opportunities for IoT applications. Thanks to its flexibility and robust features, the ESP32 can serve as the core of your next smart device. By following this guide, you’ve made a significant step toward becoming proficient in IoT development. Keep experimenting and exploring additional features like ESP-NOW and BLE for even more exciting applications.