What is Google Test
Google test is an open-source unit test framework developed by Google, written in C++. This framework provides users with the ability to implement test cases and test suites. With the help of test macros from Google test, abnormalities in the source code under test can be detected. These macros are based on Boolean, binary, and string comparisons. This document explains the step-by-step process to building the Google Test library, linking it with the library or source code under test, and writing test applications using Google Test to test the targeted library.
The following steps are usually followed when using Google test:
- Install and setup Google Test libraries on your Windows machine.
- Write the application/library (in C/ C++) under test.
- Write Google Test cases.
- Add a test case class.
- Add unit test functions for member functions.
- Utilize test fixtures and assertions provided by Google Test.
- Compile and link the test case application.
- Execute the unit tests.
All these steps are explained in detail with a use case in this document.
Note: The instructions provided in this document are specific to a Windows machine using Visual Studio 2019 or above.
1 Installation and set up on Windows Machine
Clone the Google Test code from the GitHub using the following command:
git clone https://github.com/google/googletest.git

Build Google Test and generate the Google Test libraries using the following CMake command:
cmake .. -DBUILD_GMOCK=OFF
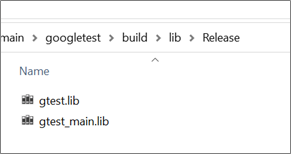
After the CMake command is complete, the Google Test libraries are generated, as shown in the image below:
2 Writing the Application/Library Under Test
In the Visual Studio solution, there will be two projects. The first project represents the algorithm, functions, or source code under test, named “myMath”. The GTest libraries are linked with the “myMath” project. The second project links “myMath” project and the GTest libraries to generate an executable named “MySampleApp”.
Note: For testing purposes, the “myMath” library contains addition and multiplication functions.
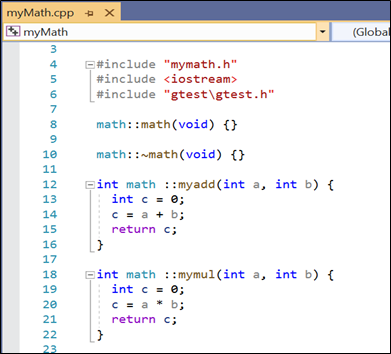
3 Integrating the Google Test Library with the Application
Add the Google Test headers path to “myMath” project, as shown in the image below

Similarly, add the GTest library path to the “myMath” project, as shown in the image below

Add any additional dependencies required

To create a static library of the “myMath” project, change the configuration type to a static library type.

4 Writing your First GTest Test Cases
Write the test cases in the “MySampleApp” project, where the Google Test and “myMath” libraries are linked to create the test application.
Adding a test case class
Google Test suggests that the “test case class” should be specific to the test.
This class is inherited/derived from the “::testing::Test” class provided by GTest.
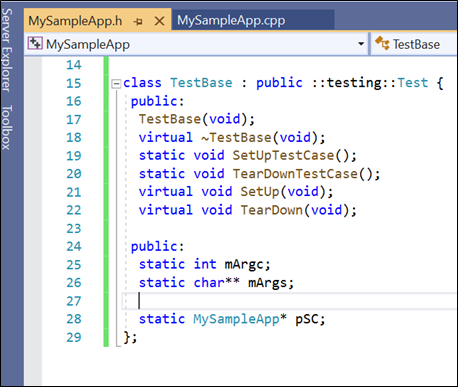
The test case class includes functions such as SetUpTestCase(), TearDownTestCase (), SetUp() and TearDown(), which are called at specific stages of the testing process. SetUp() and TearDown() gets called for each test fixtures.
SetUpTestCase() gets called for one time before the start of any test fixture.
TearDownTestCase () gets called after execution of all text fixtures.
Definitions of these four functions are as follows:


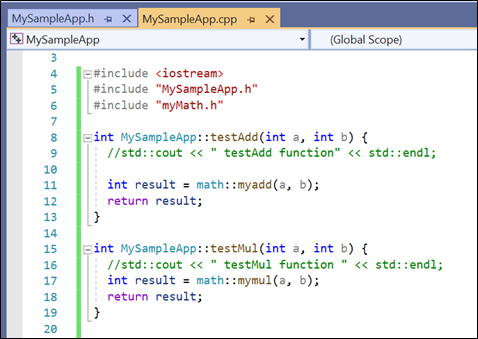
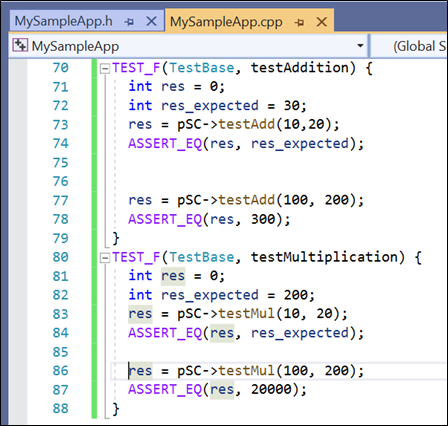
The “MySampleApp” class consists of test functions and test fixture declarations. Test functions such as testAdd() and testMul() are test case functions, and testAddition and testMultiplication are test fixtures for testing the myAdd and myMul functionality, respectively.
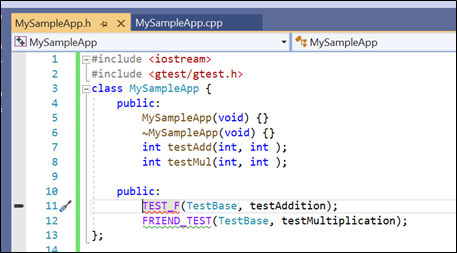
5 Adding Unit Test Functions for Member Functions
Add test case functions that call the corresponding functions from the “myMath” library, such as myadd() and mymul(), to test their behavior. Add test cases functions that call the corresponding functions from the “myMath” library, such as myadd() and mymul(), to test their behavior. The testAdd function will call myadd function from the myMath.lib library and the testMul test function will call mymul function from the myMath.lib library.
6 Using Test Fixtures and Google Test Assertions
Implement test fixture functions that utilize various assertions provided by the Google Test library to generate different test cases.
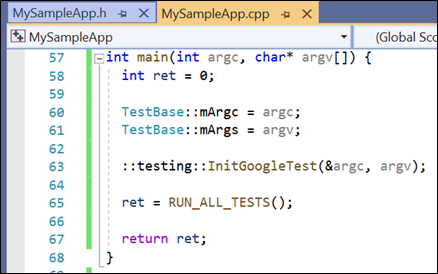
Implement the main function of the “MySampleApp” project, as shown in the image below
7 Compiling and Linking the Test Case Application
Add the path for Google Test header files and the “myMath” project to the “MySampleApp” test project, as shown in the image below

Add the Google Test libraries (gtest.lib and gtest_main.lib) to the library directory path.

Link all the required libraries to the “MySampleApp” project.

Once the tests are implemented, build the “MySampleApp” project to create an executable. Executing the Unit Tests
When the application is executed, all the Google Test cases written for the test fixtures are executed. Google Test displays the pass/fail result of each test, along with the time taken by each test case for execution in milliseconds (ms). The output for the example described in this document is shown in the images below

8. Google Test Assertions
Google test provides assertions, which are macros used to detect failures. There are two types of assertions: ASSERT_* and EXCEPT_*. In the case of ASSERT_*, execution is aborted as soon as a failure is detected, while in the case of EXCEPT_*, execution continues even if a failure is detected. EXCEPT_* assertions are typically preferred, as they detect more failures in a single execution.
| Fatal assertions | Nonfatal assertions | Result |
| ASSERT_TRUE | EXCEPT_TRUE | True |
| ASSERT_FALSE | EXCEPT_FALSE | False |
Binary Assertions
| Fatal Assertions | Nonfatal Assertions | Verifies condition |
| ASSERT_EQ (val1, val2) | EXCEPT_EQ (val1, val2) | val1 == val2 |
| ASSERT_NE(val1, val2) | EXCEPT_NE(val1, val2) | val1 != val2 |
| ASSERT_LT(val1, val2) | EXCEPT_LT(val1, val2) | val1 < val2 |
| ASSERT_GT(val1, val2) | EXCEPT_GT(val1, val2) | val1 > val2 |
| ASSERT_LE(val1, val2) | EXCEPT_LE(val1, val2) | val1 <= val2 |
| ASSERT_GE(val1, val2) | EXCEPT_GE(val1, val2) | val2 >= val2 |
String Comparison assertions
| Fatal Assertions | Nonfatal assertions | Verifies string equality |
| ASSERT_STREQ (str1,str2) | EXCEPT_STREQ (str1,str2) | Two strings same content |
| TASSERT_STRNE (str1,str2) | EXCEPT_STRNE (str1,str2) | Two strings have different content |
| ASSERT_STRCASEEQ (str1,str2) | EXCEPT_STRCASEEQ (str1,str2) | Two strings same content, ignore case |
| ASSERT_STRCASENE (str1,str2) | EXCEPT_STRCASENE (str1,str2) | Two strings have different content, ignore case |
Floating point Assertions
Rounding error comparison of floating-point numbers is tricky, hence ASSERT_EQ does not usually work. For floating-point comparison, you must choose error bound. Google Test provides default assertions to compare floating-point numbers as below:
| Fatal assertions | Nonfatal assertions | Verifies |
| ASSERT_FLOAT_EQ (val1, val2) | EXCEPT_FLOAT_EQ (val1, val2) | Two float values are almost equal |
| ASSERT_DOUBLE_EQ (val1, val2) | EXCEPT_DOUBLE_EQ (val1, val2) | Two double values are almost equal |
Applications of Google test
Google Test is a versatile tool for writing and running tests. It excels at isolating test cases by running them on different objects. Google Test is compatible with various operating systems, including Windows, Linux, and macOS. Its extensive features make it suitable for testing applications, algorithms, and systems that require the manipulation of multiple parameters at runtime, depending on various use cases. Google Test can be utilized in Android applications, audio processing, image processing algorithms, and systems requiring intensive computations.
By leveraging the Google Test framework, developers can cover many test cases in less time. The comprehensive test report provided by Google Test enables easy verification of the status of all test cases.
Notably, Google Test was developed by Google but is widely used in other major projects, including Android Open Source, Chromium projects (ChromeOS and Chrome browser), LLVM compiler, OpenCV, and Gromacs molecular dynamics simulation package.


