Mobile Test Automation is a key process to produce high-quality, robust and reliable apps. It also increases test efficiency, test effectiveness and enables faster time-to-market for apps. Nowadays, various test automation frameworks and test automation tools like Appium, Robotium, Selendroid, Appium Desktop, Monkey Talk, UIAutomator, Ranorex, Calabash, Testdroid etc. are available to execute test automation quite effectively and conveniently.
Let’s discuss one of these tools named Appium Desktop in detail.
What is Appium Desktop?
Appium Desktop is a new open source GUI application for Windows, Mac, and Linux which gives you the power of the Appium automation server in a more organized manner with a flexible UI.
Appium Desktop is a combination of two essential components of Appium:
- Appium Server: Server instance for enabling testing (and test automation) of apps.
- Appium Inspector: For inspecting and getting all the details of UI elements of your apps.
Appium Desktop helps to create easy test scripts, set up a quick Appium test server, and even set up the Appium environment with Appium Desktop installation.
Why Appium Desktop?
- Enables users to work with Appium on desktop
- Provides Inspector for better analysis of apps
- Provides the ability to switch between web-view and native app view from inspector
- Enables more element access and context handling
- Provides an action recorder and code generator
- Allows using desired capabilities and presets configuration for convenient use
- Provides enhancement in the test script build
How to install Appium Desktop?
- Visit Appium Desktop release page to get the details of all the versions of Appium Desktop
- In the download section of the latest release, you will find different packages for Windows, Mac, and Linux
- Download the latest version and the right package for your platform (Windows, Mac or Linux) and save it on your machine
- Open the downloaded file, click on Appium Installer and install it like any other application on your OS. Note: If you’re on Mac OS, you will need to install Appium Desktop by copying the app from the downloaded DMG (Apple disk image) file to your own file system
- To verify successful installation and setup, click on Start Server button. This would start the Appium Server by displaying ‘The server is running’ message in the Appium Window
- To stop the Appium Server, click on Stop Server button
BONUS BLOG
Appium Desktop Features:
1. Appium Server/ Appium Desktop Client:
It provides a GUI where you can set options, start/stop the server, see logs, etc. You don’t need to use Node/NPM (Node Package Manager) to install Appium, as it comes bundled with Appium Desktop.

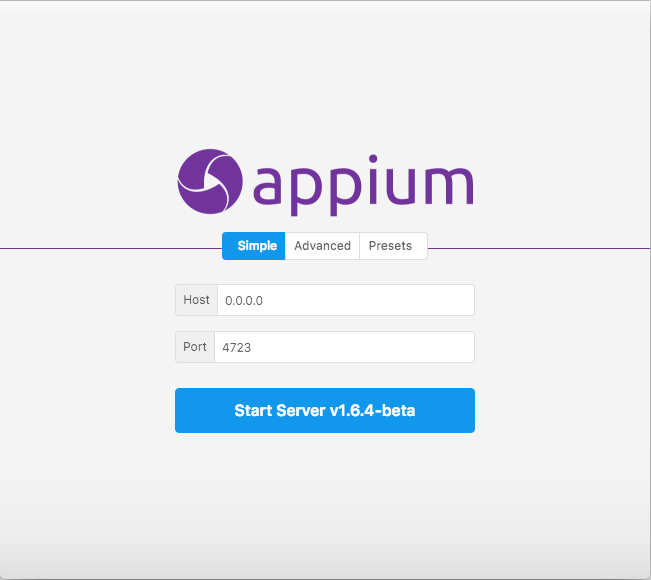
As you can see in the figure, Appium Server has 3 Tabs named Simple, Advanced and Preset.
Simple Tab: Appium Server requires minimum 2 parameters to run – Host and Port. You can change the default host and port values which are “0.0.0.0” (for Host) and “4723” (for Port) by default. Appium would take the default values for these parameters to start the server if you don’t provide any specific values.

You can stop the server by clicking a button with the Pause icon and close the log by clicking on the Cancel button. The Simple Tab is straightforward and a bit easy to work with. But users generally do not use this tab as Appium Server has not been run with default values. And thus, Advanced Tab comes into the picture.
Advanced Tab: In this tab, you have 3 sections as below:
- General Section: Contains options required for both iOS and Android
- iOS Section: Contains options for iOS automation
- Android Section: Contains option needed for Android automation
The options in iOS and Android sections are not always necessary. These are required only in the cases where you want to automate certain scenarios as per your criteria. For example, if you want to automate some scenarios using ChromeDriver Port in Android, then you can select Android section, otherwise, you can skip this.
Preset Tab: You can make changes as per your requirements and save them for the future execution. You need to provide Server Address and Server Port values and tick Allow Server override checkbox and then need to click on “Save as Preset” button. A pop-up window will appear as below.

Give that preset any name and click on save. You can use this preset by selecting it in Preset tab and start the Appium server. You can save multiple presets as per your desired different options to start the Appium server.
2. Appium Inspector:
It is a visual representation to look at your application’s elements along with the ability to get basic information about them, and perform basic interactions with them.
To inspect the element, you must set the Desired Capabilities first which are used to inform Appium Server that what kind of platform and application you want to automate. It includes the name and type such as text, number, file path or JSON object. You need to save them as Presets by clicking on “Save As” button and giving it a name. You can later access it from “Save Capability Set” tab, for editing or launching a session.

The Inspector window can perform certain actions like below:
- Back (call driver.back)
- Refresh (refresh the source and take screenshot)
- Start recording the section
- Quit the session (call driver.quit and close the Inspector)
3. The Recorder:
Appium Desktop comes with an action recorder which helps you to record user actions and to produce test code. The process of using the record feature is as below:
- Connect to the device or simulator from Appium Desktop
- Start the recorder
- Copy your code into clipboard by clicking on the recorder button on the top right corner
- Paste the code into Eclipse by creating a new Test Class, installing required Appium client libraries and start evaluating the errors
eInfochips provides a unified Test Automation Framework that enables easy automation, reduces operating cost, and ensures high-quality solutions with 40% reduction of efforts over traditional automation methods. With a wide range of features, it provides more robustness and flexibility to your test automation activities. To know more, get in touch with us.


