
Before diving into the intricacies of Docker and Kubernetes, please note that this blog is enriched with numerous practical examples. Refer to the following sections for access to the complete files.
Note: For all reference files please click here.
Understanding Docker
Docker simplifies the creation, deployment, and execution of applications using containers.
Benefits of Docker
Docker offers several benefits that make it a popular choice for developers and organizations:
- Portability: Any system that installs Docker may execute Docker containers anywhere. As a result, you may create locally, launch applications to the cloud, and use them from any location.
- Consistency: Docker containers guarantee consistency between various production, staging, and development environments. This implies that programs can behave the same way in many situations.
- Isolation: Docker makes sure your resources and apps are kept apart and separated. Docker containers operate independently of one another, allowing you to have your own libraries, system configurations, etc. without having to worry about dependencies getting in the way.
- Security: You have total control over traffic flow and management since Docker makes sure that apps running inside of containers are totally isolated from one another. The security benefit of this is enormous.
- Efficiency: Docker containers operate quickly and light-weight. Containers are far more resource-efficient than virtual machines since they do not have a guest operating system and share the host OS kernel among themselves.
- Scalability: For simple scalability, Docker may be used with orchestration systems like Kubernetes or Docker Swarm. Depending on your demands, you may change the number of containers.
- Version Control for Systems: Version control is integrated into Docker. Versions of a container can be tracked, and you can go back and see who produced a version and how.
- Developer Productivity: Docker frees developers from worrying about the system on which their code will execute, allowing them to concentrate on developing code. Because it can multiplex diverse application components onto the same infrastructure, it also aids in reducing the number of systems required.
- CI/CD Integration: Docker’s isolation and scalability properties make it an excellent choice for continuous integration and deployment (CI/CD). With automated pipelines, it makes software development, testing, and deployment quick and simple for system administrators and developers.
How portability is ensured by Docker
By encapsulating programs and their dependencies into containers, Docker provides portability. Let’s see how Docker makes this happen:
- Lightweight Containers:
- An application and its dependencies are encapsulated in Docker containers, which are isolated, lightweight environments.
- By operating consistently across several platforms, these containers solve the infamous “it works on my machine” issue.
- Immutable Images:
- Once generated, Docker images are immutable, which means they cannot be altered.
- You edit the Dockerfile and build a new image when you need to make changes to an application.
- Declarative Dockerfiles:
- Docker images are created using Dockerfiles, which are declarative text files.
- A Dockerfile contains instructions on how to construct the image, such as importing application code, adding base images, establishing the runtime environment, and setting up dependencies.
- Consistent Behavior:
- Containers are reliable and efficient because they use the kernel of the host system.
- Docker makes it simple to manage containers, including their start, stop, pause, and removal.
- This uniformity guarantees that programs operate consistently in various settings.
Deep dive into Dockerfile with a C# application example
- Create a .NET Core Application
Assume we have created .Net core application named MyApp. - Create a Dockerfile
Now let’s create a Dockerfile to build a container image for our C# application. In the same directory as your .csproj file, create a file named Dockerfile (with no extension) and open it in a text editor.
Here’s a sample Dockerfile for our C# app:
# Use the ASP.NET Core runtime image as the base
FROM mcr.microsoft.com/dotnet/runtime:6.0# Assign the container’s working directory.
WORKDIR /app# Transfer the completed program into the container.
COPY bin/Debug/net6.0/publish .# Specify the entry point (executable) for the container
ENTRYPOINT [“dotnet”, “MyApp.dll”]Explanation:
Our foundation is the official.NET 6 runtime image.
Inside the container, set the working directory to /app.
Transfer the compiled application into the container (from the publish folder).
Specify the container’s (our app’s) entry point. - Construct the Docker image
Now run the following command to create the Docker image:
docker build -t MyAppImage - Launch the container for Docker 𝗕𝗲𝗻𝗲𝗳𝗶𝘁𝘀 𝗼𝗳 𝗗𝗼𝗰𝗸𝗲𝗿
Run the container lastly:
docker run –rm MyAppContainer
Knowing Kubernetes
A platform for managing containerized workloads and services that is open-source, expandable, and portable is called Kubernetes. It makes declarative setup and automation easier, giving you predictable, scalable, and highly available container deployment, scaling, and management.
What is K8s, or Kubernetes?
Kubernetes, also known as “K8s”, is an open-source technology for container orchestration. It offers a strong architecture for handling workloads and services that are containerized. The main features of Kubernetes are as follows:
- Container Management: The deployment, scaling, descaling, and load balancing of containers are all automated by Kubernetes. It makes sure your containerized apps execute when and where you want them to by acting as a helmsman.
- Configuration Declarative
- Configuration Declarative: Using configuration files, you provide the desired state of your application (YAML or JSON). Next, Kubernetes makes sure that the intended state and the actual state coincide.
- Automation: Kubernetes handles tasks like deploying, scaling, and managing containers, reducing manual intervention and human errors.
- Community-driven: Kubernetes was initially created by Google and subsequently given to the Cloud Native Computing Foundation (CNCF). It has a sizable community and integrates well with many cloud providers.
Benefits of Kubernetes:
Let’s explore the advantages of using Kubernetes:
- Automated Deployment and Management:
- Kubernetes automates deployment, scaling, and containerization.
- Reduces human errors and makes deployments more effective.
- Scalability:
- Depending on the load, horizontal pod scaling automatically modifies the number of pods.
- Scale your application containers with ease as required.
- High Availability:
- Kubernetes makes sure your application keeps working even when things go wrong.
- For resilience, parts like controller managers and API servers are duplicated.
- Cost-Effectiveness:
- Optimizes resource utilization, preventing overprovisioning.
- Controls infrastructure costs by efficiently managing resources.
- Improved Developer Productivity:
- Developers can focus more on coding, as Kubernetes handles deployment complexities.
How Kubernetes Ensures Scalability and High Availability:
Kubernetes achieves scalability and high availability through several strategies:
- Replication and Scaling:
-
- Replicate containers (pods) to handle varying workloads.
- Horizontal pod scaling automatically adjusts replica counts based on demand.
- Node-Level Redundancy:
-
- To provide high availability, deploy several master nodes.
- The cluster continues to function even if one master fails.
- Load balancing and service discovery:
-
- Kubernetes services offer a single IP address and DNS name for pod access.
- Load balancers effectively split up network traffic among several pods.
- Persistent Volumes and StatefulSets:
-
- Persistent volumes ensure data persistence even if pods restart.
- StatefulSets manage stateful applications with unique identities.
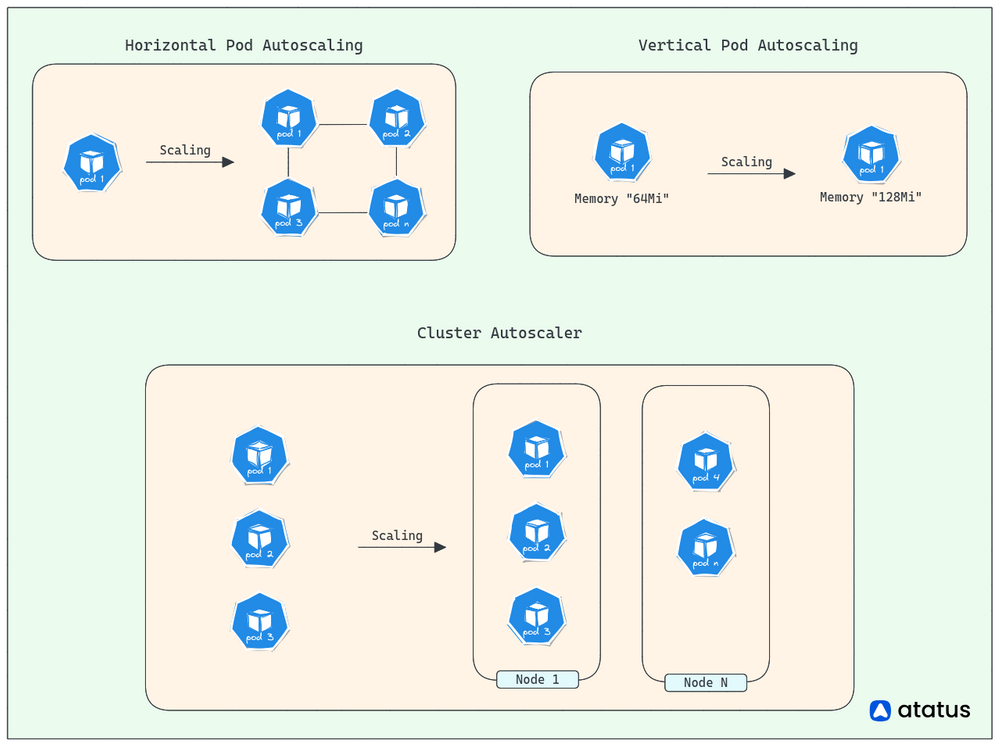
Kubernetes Autoscaling Guide

Image Credits – https://www.atatus.com
Cluster Autoscaling
Cluster autoscaler allows us to scale cluster nodes when they become full. It is recommended to learn about scaling your cluster nodes before scaling pods.
Horizontal Pod Autoscaling (HPA)
HPA allows us to scale pods when their resource utilization goes over a threshold.
Requirements
A Cluster For both autoscaling guides, we’ll need a cluster. For Cluster Autoscaler, you need a cloud-based cluster that supports the cluster autoscaler. For HPA, we’ll use kind.
Cluster Autoscaling – Creating an AKS Cluster
Here’s an example of creating an AKS cluster on Azure:
NAME=aks-getting-started
RESOURCEGROUP=aks-getting-started
SERVICE_PRINCIPAL=
SERVICE_PRINCIPAL_SECRET=
az aks create -n $NAME \
–resource-group $RESOURCEGROUP \
–location australiaeast \
–kubernetes-version 1.16.10 \
–nodepool-name default \
–node-count 1 \
–node-vm-size Standard_F4s_v2 \
–node-osdisk-size 250 \
–service-principal $SERVICE_PRINCIPAL \
–client-secret $SERVICE_PRINCIPAL_SECRET \
–output none \
–enable-cluster-autoscaler \
–min-count 1 \
–max-count 5
Horizontal Pod Autoscaling – Creating a Kind Cluster
For this demo, we’re using a node with 6 CPU cores:
kind create cluster –name hpa –image kindest/node:v1.18.4
Metric Server
For Cluster Autoscaler, on cloud-based clusters, the Metric server may already be installed. For HPA, we’re using kind.
Metric Server provides container resource metrics for use in autoscaling pipelines. Since we’re running Kubernetes 1.18 in kind, we need Metric Server version 0.3.7.
Important Note: For demo clusters (like kind), you will need to disable TLS. You can do this by adding the following to the metrics-server container args:
– –kubelet-insecure-tls
– –kubelet-preferred-address-types=”InternalIP”
For production, make sure you remove the above lines.
To deploy the Metric Server, use the following commands:
cd kubernetes\autoscaling
kubectl -n kube-system apply -f .\components\metric-server\metricserver-0.3.7.yaml
# Test
kubectl -n kube-system get pods
# Note: wait for metrics to populate!
kubectl top nodes
Example Application
For all autoscaling guides, we’ll need a simple app that generates some CPU load. Here are the steps to build the app, push it to a registry, ensure resource requirements are set, deploy it to Kubernetes, and ensure metrics are visible for the app:
# Build
cd kubernetes\autoscaling\components\application
docker build . -t aimvector/application-cpu:v1.0.0
# Push
docker push aimvector/application-cpu:v1.0.0
# Resource requirements
resources:
requests:
memory: “50Mi”
cpu: “500m”
limits:
memory: “500Mi”
cpu: “2000m”
# Deploy
kubectl apply -f deployment.yaml
# Metrics
kubectl top pods
Cluster Autoscaler
For cluster autoscaling, you should be able to scale the pods manually and watch the cluster scale. Cluster autoscaling stops here. For Pod Autoscaling (HPA), continue.
Generate some traffic
Let’s deploy a simple traffic generator pod:
cd kubernetes\autoscaling\components\application
kubectl apply -f .\traffic-generator.yaml
# Get a terminal to the traffic-generator
kubectl exec -it traffic-generator sh
# Install wrk
apk add –no-cache wrk
# Simulate some load
wrk -c 5 -t 5 -d 99999 -H “Connection: Close” http://application-cpu
You can scale the pods manually and see that roughly 6-7 pods will satisfy resource requests:
kubectl scale deploy/application-cpu –replicas 2
Deploying an Autoscaler
Next, we scale the deployment back down to 2 and deploy the autoscaler:
# Scale the deployment back down to 2
kubectl scale deploy/application-cpu –replicas 2
# Deploy the autoscaler
kubectl autoscale deploy/application-cpu –cpu-percent=95 –min=1 –max=10
The pods should scale to roughly 6-7 to match the criteria of 95% of resource requests:
kubectl get pods
kubectl top pods
kubectl get hpa/application-cpu -owide
kubectl describe hpa/application-cpu
Autoscaling of Vertical Pods
We can adjust request values on our pods automatically based on recommendations thanks to the Vertical Pod Autoscaler. This aids in fine-tuning the request values according to actual memory and CPU consumption.
Putting a Kubernetes Cluster in Place
We require a Kubernetes cluster in order to begin. We can make one by employing kind:
kind create cluster –name vpa –image kindest/node:v1.19.1
Metric Server
The Metric Server is essential for both the Cluster Autoscaler and HPA. On cloud-based clusters, the Metric server may already be installed. However, for our local setup with kind, we need to install it manually.
Metric Server provides container resource metrics for use in autoscaling pipelines. Since we’re running Kubernetes 1.19 in kind, we need Metric Server version 0.3.7. You can download it from here.
Important Note: For demo clusters (like kind), you will need to disable TLS. You can do this by adding the following to the metrics-server container args:
– –kubelet-insecure-tls
– –kubelet-preferred-address-types=”InternalIP”
For production, make sure you remove the above lines.
To deploy the Metric Server, use the following commands:
cd kubernetes\autoscaling
kubectl -n kube-system apply -f .\components\metric-server\metricserver-0.3.7.yaml
# Test
kubectl -n kube-system get pods
# Note: wait for metrics to populate!
kubectl top nodes
Vertical Pod Autoscaler (VPA)
Next, we install the VPA. You can find the VPA docs here. We’ll install the VPA from a container that can access our cluster:
cd kubernetes/autoscaling/vertical-pod-autoscaling
docker run -it –rm -v ${HOME}:/root/ -v ${PWD}:/work -w /work –net host debian:buster bash
# Install git
apt-get update && apt-get install -y git curl nano
# Install kubectl
curl -LO https://storage.googleapis.com/kubernetes-release/release/`curl -s https://storage.googleapis.com/kubernetes- release/release/stable.txt`/bin/linux/amd64/kubectl
chmod +x ./kubectl
mv ./kubectl /usr/local/bin/kubectl
cd /tmp
git clone https://github.com/kubernetes/autoscaler.git
cd autoscaler/vertical-pod-autoscaler/
./hack/vpa-up.sh
# After a few seconds, we can see the VPA components in:
kubectl -n kube-system get pods
Building and Deploying an Example App
Now, let’s build and deploy an example app:
# Build
cd kubernetes\autoscaling\components\application
docker build . -t aimvector/application-cpu:v1.0.0
# Push
docker push aimvector/application-cpu:v1.0.0
# Deploy
kubectl apply -f deployment.yaml
# Metrics
kubectl top pods
Generating Traffic
To test our setup, we’ll deploy a simple traffic generator pod and simulate some load:
cd kubernetes\autoscaling\components\application
kubectl apply -f .\traffic-generator.yaml
# Get a terminal to the traffic-generator
kubectl exec -it traffic-generator sh
# Install wrk
apk add –no-cache wrk
# Simulate some load
wrk -c 5 -t 5 -d 99999 -H “Connection: Close” http://application-cpu
Deploying an Example VPA
Next, we deploy an example VPA:
kubectl apply -f .\vertical-pod-autoscaling\vpa.yaml
kubectl describe vpa application-cpu
Deploying Goldilocks
Finally, we deploy Goldilocks:
cd /tmp
git clone https://github.com/FairwindsOps/goldilocks.git
cd goldilocks/hack/manifests/
kubectl create namespace goldilocks
kubectl -n goldilocks apply -f ./controller
kubectl -n goldilocks apply -f ./dashboard
kubectl label ns default goldilocks.fairwinds.com/enabled=true
kubectl label ns default goldilocks.fairwinds.com/vpa-update-mode=”off”
kubectl -n goldilocks port-forward svc/goldilocks-dashboard 80
Kubernetes – Load Balancing Service
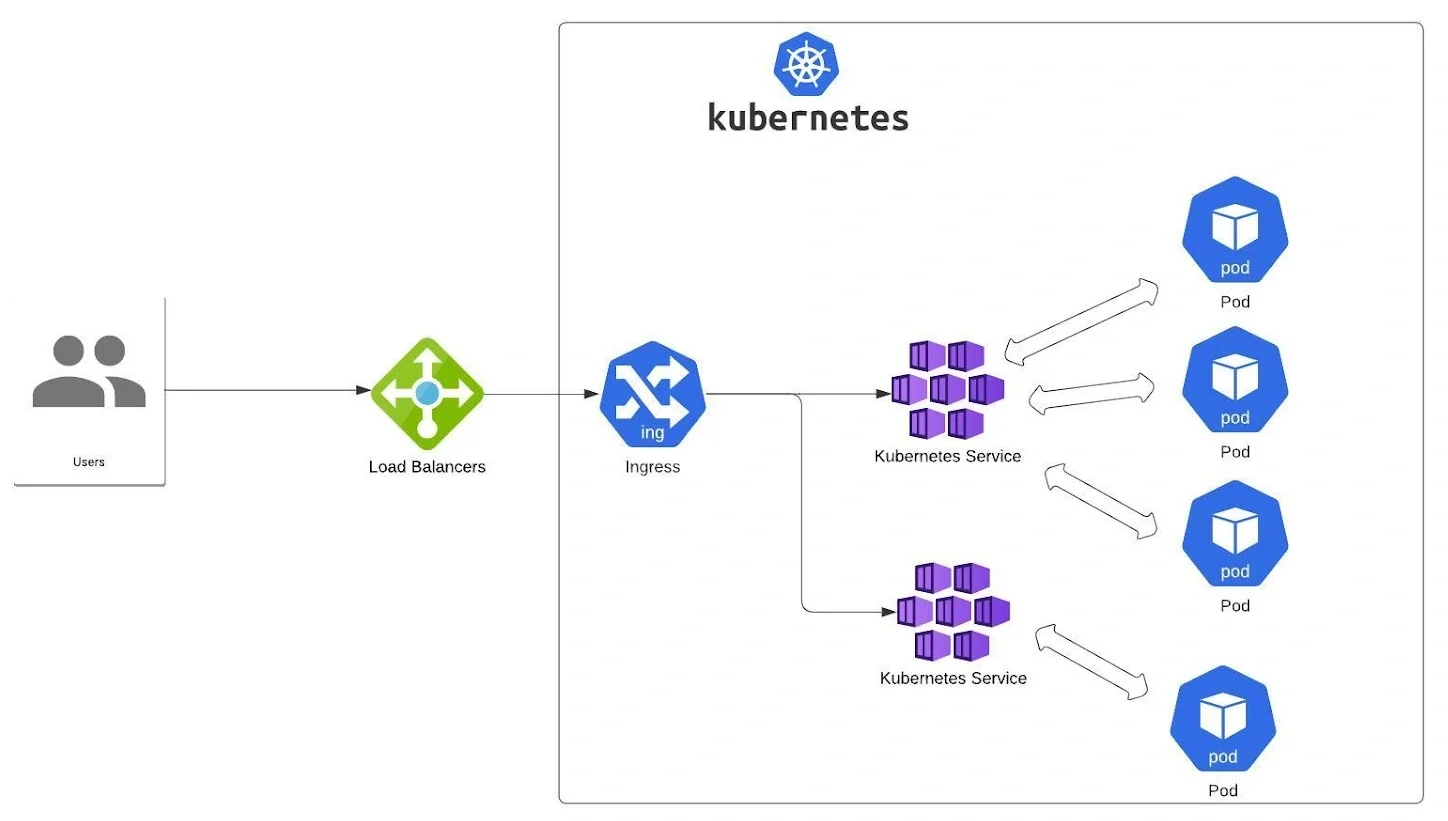
Image Credits – https://lh4.googleusercontent.com
Pre-requisite: Kubernetes
It’s crucial to understand Docker and containers before tackling Kubernetes, or K8S for short. A tool called Docker assists developers in building containers, which allow programs to operate in a separate setting. All that containers are is an abstraction for the apps that run within. In addition, Docker has many other features that allow these containers to interact with one another and exchange data with the host computer.
Likewise, these containers are managed by Kubernetes, which also improves their usefulness and availability. Kubernetes contains nodes, pods, and containers, whereas Docker just has containers. Pods reside in Nodes, and Containers are housed in Pods. More container separation is ensured by Kubernetes.
Service
A service is a feature that is not enabled by default on nodes, pods, and containers. The specific service that we wish to allow must be specified. The Kubernetes cluster provides a number of services, including load balancing and NodePort services. We shall go into great detail about the load balancer service in this article.
Load Balancing Service
Envision managing a business and seeking to appoint personnel. We provide a link so that interested parties can schedule an interview time and submit their resumes. But we can only support roughly ten users on our website at once. This restriction may cause the organization to lose out on exceptional talent in the end. We need load balancers to tackle this issue. When the number of users above a certain threshold, these load balancers build a new clone website and divert any more users to the newly established clone website.
Establishment of Deployment
We can use YML or JSON configuration files for the deployment, or we can just run commands on the CLI to create a deployment. When containerized apps are created and changes can be made to the same applications, deployment notifies the pods about these developments. To create this deployment, we will be using the Nginx image.
Making Use of CLI Command
$ kubectl create deployment webserver-deployment –image=nginx:latest
$ kubectl get deployments
$ kubectl get pods
The pod’s state is “ContainerCreating” since it will take some time to generate and launch the container.
Deployment Manifest File Utilization
A deployment manifest file must be made. This manifest file is an example of one of these. Because YAML is an easy-to-use format for humans to produce and change, this file was created in it. Aside from configuration files, YAML is also utilized in log files, complex data structures, and interprocess communications. Make a “loadBalancerDeployment.yml” YAML file.
apiVersion: apps/v1
kind: Deployment
metadata:
name: deployment-nginx
labels:
app: nginx-application
spec:
replicas: 1
selector:
matchLabels:
app: nginx-application
template:
metadata:
labels:
app: nginx-application
spec:
containers:
– name: nginx-container
image: nginx:latest
ports:
– containerPort: 80
resources:
limits:
memory: “128Mi”
cpu: “500m”
requests:
memory: “64Mi”
cpu: “250m”
livenessProbe:
httpGet:
path: /
port: 80
initialDelaySeconds: 30
periodSeconds: 10
readinessProbe:
httpGet:
path: /
port: 80
initialDelaySeconds: 5
periodSeconds: 10
Run the command below to create this deployment.
$kubectl loadBalancerDeployment.yml -f create
The establishment of a load-balancing service and its connection to deployment
A service manifest file must be created before we can create a load balancer service. Using the labels of the previously used pods in the deployment manifest file, we can associate this service with the pods.
apiVersion: v1
kind: Service
metadata:
name: service-nginx
labels:
app: nginx-application
spec:
selector:
app: nginx-application
type: LoadBalancer
ports:
– nodePort: 31000
port: 80
targetPort: 80
Run the command below to create this service.
$ kubectl create -f loadBalancerService.yml
Information about the Service
Run the command below to see if the service has been created. It provides a succinct overview of the service.
$ kubectl get services -l app: nginx-application
To obtain information about the load balancer service, execute the command “kubectl describe.”
$ kubectl describe service service-nginx
To obtain information regarding the load balancer service, use “kubectl describe.”
Conclusion
We have addressed the following important topics in our exploration of containerization and orchestration:
Docker:
- Docker is a potent platform for containerization that enables you to bundle apps and their dependencies into small, portable containers.
- Efficiency, reproducibility, and isolation are some of Docker’s advantages.
- By encapsulating all an application needs to run reliably across several environments, Docker provides portability.
Kubernetes:
- Kubernetes is an open-source platform for container orchestration, sometimes referred to as K8s.
- Cost-effectiveness, scalability, high availability, and automated deployment are among of its advantages.
- Kubernetes uses techniques like load balancing, stateful management, and replication to provide scalability and resilience.
Last Words:
Kubernetes and Docker represent complementary technologies that, when combined, form a robust framework for modern software management and deployment. Kubernetes excels in orchestration, ensuring that applications run smoothly across different computing environments. Docker, on the other hand, simplifies the packaging and delivery process, making it easier to create and distribute containerized applications. Together, they provide a comprehensive solution that enhances the efficiency and reliability of deploying complex systems


